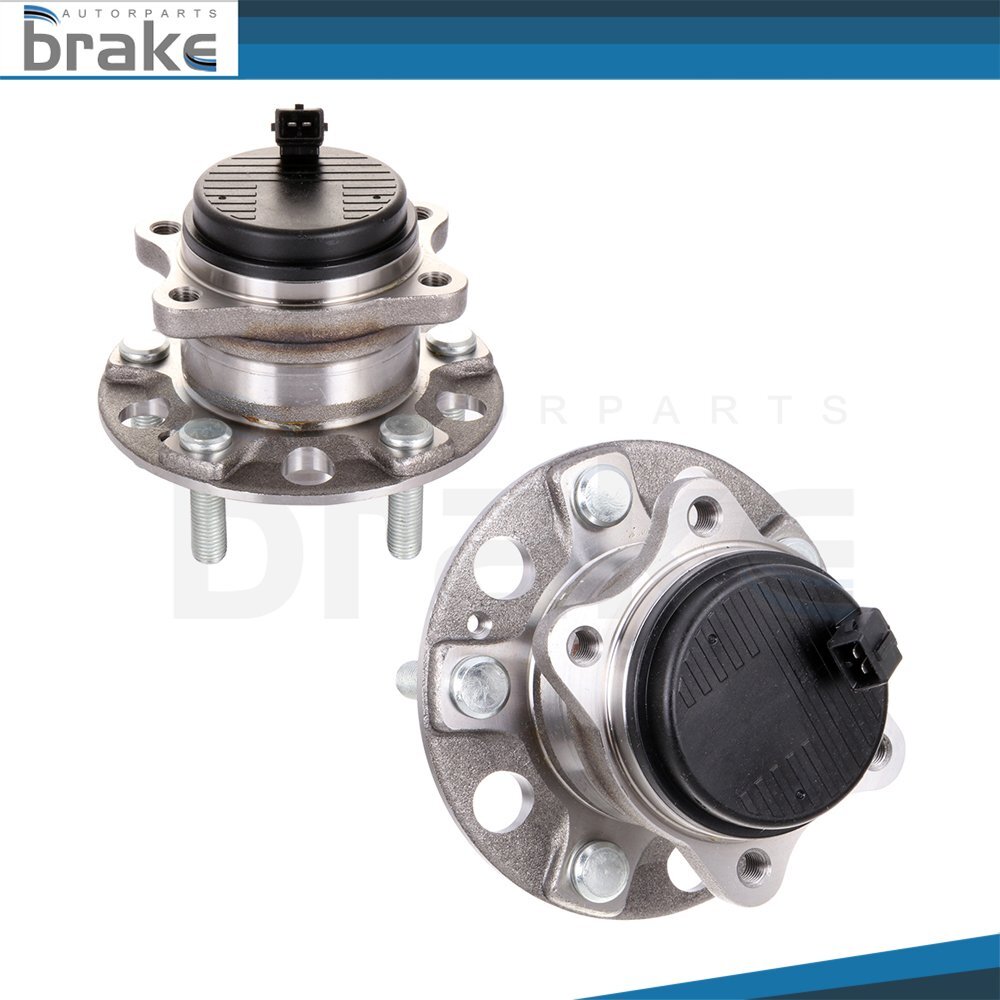
Specifications- Fits both LH (Driver Side) & RH (Passenger Side) REAR- Has ABS sensorw/stainless steel sensor & plastic wire clips- Direct fit, designed for vehicle specific application on all makes and models- Latest generation design used in manufacturing our hub assemblies- High quality seal design ensures a clean, long lasting hub bearing- Sensors designed to match specific make and model- Precision machined and pre-coated with anti-corrosion lubricant- Manufactured for quick and easy installationFor the following years and models: 2 Rear Wheel Hub Bearing For Hyundai Sonata Tucson Kia Optima Sportage Cadenza
Specifications
- Fits both LH (Driver Side) & RH (Passenger Side) REAR
- Has ABS sensorw/stainless steel sensor & plastic wire clips
- Direct fit, designed for vehicle specific application on all makes and models
- Latest generation design used in manufacturing our hub assemblies
- High quality seal design ensures a clean, long lasting hub bearing
- Sensors designed to match specific make and model
- Precision machined and pre-coated with anti-corrosion lubricant
- Manufactured for quick and easy installation
For the following years and models:
- For Hyundai Sonata 2015Built After 4/2014; Without Electric Parking Brake
- For Hyundai Sonata 2016-2019Without Electric Parking Brake
- For Hyundai Tucson 2016-2017FWD; Gas
- For Hyundai Tucson 2018-2021FWD
- For Hyundai Veloster N 2019-2022
- For Kia Cadenza 2017Without Electric Parking Brake
- For Kia Cadenza 2018-2020
- For Kia Optima 2016-2020Without Electric Parking Brake
- For Kia Sportage 2017-2019FWD; Without Electric Parking Brake
- For Kia Sportage 2020-2021FWD
- For Kia Sportage 2022FWD; Except Nightfall Edition
Packing include:
2 Pcs wheel hub bearing
1 Year Warranty
How to Install a Wheel Bearing Hub
Park the vehicle on a flat, level paved or concrete surface. Place the vehicle in gear or park and apply the parking brake. Place a wheel chock behind a rear tire (or front if you're doing a rear hub-bearing assembly). Loosen the lug nuts on the wheel of the hub bearing you're replacing with the breaking bar and a socket; do not remove them. Lift the wheel with the floor jack in a safe and secure manner. Support the vehicle on a jack stand, preferably on the frame rail if present. Remove the lug nuts and wheel. Locate the caliper bolts and remove them with the ratchet and a socket. Pry the caliper off gently using a large straight-edged screwdriver and support the caliper on the coil spring with a bungee cord. Do not allow the caliper to dangle on the rubber brake hose. Locate the caliper bridge bolts (if applicable) and remove them with the ratchet and a socket. You may want to break them loose with the breaking bar first if they're really tight. On some vehicles, the brake pads will remain in the bridge and can be removed by prying out with the screwdriver. On other models, the pads stay intact and may be clipped to the caliper. If you have to remove the pads, do so by taking note how they were placed in the bridge and be sure you're able to put them back in the same manner they were extracted. Remove the rotor. If it is stuck to the hub, you may have to hit it with a large rubber mallet. Use a rubber mallet if you're not going to replace the rotor, so you don't damage the surface. Remove any ABS wires attached to the hub bearing assembly (if applicable) or unclip the wire and trace it to the plug. In many applications, if the ABS wire is integrated with the wheel-bearing hub assembly, a new one will come with it. If you're not sure, check the box of the new bearing and if there's an ABS wire, follow the wire until you locate the plug, unplug it and unclip it from its mounts. If ABS is present but not integrated with the bearing assembly, remove the sensor from the bearing with a ratchet and socket. Remove the spindle nut with the breaking bar and a spindle nut socket. Remove the washer behind the spindle nut. Locate the wheel-bearing assembly bolts behind the knuckle, and loosen them with the breaking bar and socket. The location of these can sometimes create a tight area to place a socket and tool on to remove them with. You may have to apply some ingenuity. Replace the socket on the ratchet to extract the bolts quickly and easier. Most hubs have three or four bolts. Install the slide hammer onto the lug studs and secure with tightened lug nuts. This may take several attempts and a couple of breaks in between to remove the hub bearing from the knuckle. Pay close attention to your progress and try to determine when the bearing will separate. Take note of how the backing plate is installed between the knuckle and the bearing so you can replace it in the same manner. Sand off the rust and corrosion around the knuckle with a fine- to medium-grade sandpaper. Move the drive-shaft spindle around to get it out of your way. Take your time when doing this and make sure it's as clean as possible. Place the backing plate in its original position and place the new bearing onto the knuckle. Manipulate the drive-shaft spindle splines into the center of the hub bearing. Push the bearing on as far as you can, making sure to line it up correctly if ABS lines or plugs are present. Replace the wheel-bearing assembly bolts. They're pretty long, so as soon as you can thread them into the new bearing, start to tighten them. Pull the bearing in by tightening the bolts a little bit at a time and then switching to the next bolt to make sure the bearing assembly does not shift in the knuckle and cause damage. Once the bearing is drawn in flush, use the breaking bar to get the bolts as tight as you can get them. Replace washer and spindle nut and tighten to proper torque specifications with the half-inch drive torque wrench and spindle socket. Replace the brakes in the same manner you extracted them. You may need to push the caliper piston in a bit with a C-clamp to get it over the rotor. Plug in the ABS lines or reattach them to the bearing, if applicable. Replace the tire and lug nuts, and tighten the lug nuts as tight as you can get them. Lower the vehicle and tighten the lug nuts in an alternate fashion with the torque wrench and socket at the correct wheel nut specifications torque setting. Pump the brake pedal if you had to push the caliper piston in with a C-clamp to restore hydraulic pressure to that caliper piston. Remove the wheel chock, release the parking brake, and go for a test drive. Item SpecificsManufacturer Part Number Br512553Dx2 wheel hub bearingsInterchange Part Number Br821876DLug Quantity 5 LugsHas ABS sensor Yes (Has ABS with tegral Sensor)Brand brakeautorSpline Quantity N/ABolt Circle Diameter 4.5 in. / 114.3 mmWheel Pilot Diameter 2.64 in. / 67 mmArticle Wheel Hub BearingFlange Offset 2.32 in. / 59 mmPlacement Left Right RearFlange Diameter 5.63 in. / 143 mmBrake Pilot Diameter 2.99 in. / 76 mmWeight 6.89kgReference OEM number 52730C1100Other Part Number For Kia HyundaiWarranty 1 YearPackage 2 pcs wheel hub bearing
Payment Policy
Please use the checkout system when paying for your order.
If you want to change the shipping address, please contact us by messages.
Shipping & Handling Time
Shipping:Delivery Time is about 3-7 business days to most of countries.
All domestic orders will be shipped via USPS, UPS or FedEx from our US warehouse and usually arrives to your door in about 2-7 business days.
Return Policy
Seller will beresponsible for return if there's any quality problem or wrong message provided in listing.
Be sure to check the compatible chart above, and be sure you have chosen the right item.
Warranty Policy
All of our brand new items come with a 30-Days money-back guarantee.
Contact Us
- Confused in confirming the compatibility about the item;
- Puzzled in how to install the item to your vehicle/car/truck/etc;
We are always here to answer and reply.
Rotors & PadsBrake RotorsBrake PadsBrake CalipersOther Brake Parts Shop CategoryStore Home ATV & UTV CV Axle Shaft Assy steering knuckle-7 ABS Wheel Sensor Air & Fuel Delivery◈Air Intake & Fuel Sensors Air Cleaner Filter Box Auto CV Axle Shaft Assembly Auto Spoiler Wings Bed Step Body Cab Mount Bushing Kit Brake Caliper Brake Calipers & Pads Brake Calipers & Rotors & Pads Brake Drums Brake Dust Shield Brake Pad Sensors Brake Pads Brake Rotors Brake Rotors & Pads cargo cover Catalytic Converter Engine Mount Engine Oil Dipstick Exterior Parts & Accessories◈Bumpers & Components Fuel Pump Assembly Headlight Assembly Hub Caps Jake Stand Leveling Lift Kit Lift Supports Other Splash Guards & Mud Flaps Steering & Suspension◈Air Suspension Spring◈Shocks, Struts & Assemblies Steering Shaft Steering Wheels & Horn Butt Throttle Body Assembly Trailer Tools Series Turbocharger UTV & ATV Brake System Parts◈Brake Shoes Wheel Hub Bearing Wheel Hub Bearing Knuckle wheel lug nut Wheel Rims Wheel Spacer Window Regulator AssemblyHot Item 3\" Rear Leveling Lift Kit Blocks Fits Chevy Silverado GMC Sierra 1500 1999-2020 USD 50.67 Pair Front Wheel Hub Bearing For Nissan Sentra 2007-2012 For Rogue 2008-2013 USD 56.39 1\" Rear Leveling Lift Kit Blocks For Chevrolet Silverado GMC Sierra 1500 2WD 4WD USD 44.23 2 Front Wheel Hub Bearing For Toyota Prius 2010-2015 Lexus Ct200H 2011-2017 Base USD 62.29 Front Wheel Hub Bearing For Chevrolet Impala Buick LaCrosse Pontiac Grand Prix USD 38.10 New List Item Pair Front Rear Brake Calipers & Ceramic Pad Kit For 2009-2018 DODGE RAM 1500 USD 227.20 2Pcs Front Disc Brake Calipers w/Bracket For 2001 - 2006 Hyundai Santa Fe USD 85.50 4 X For 2005-2009 Subaru Outback Front And Rear Complete Struts Shocks W/Spring USD 203.74 4 X For 2006-2013 Suzuki Grand Vitara RWD Front And Rear Complete Struts Shocks USD 157.63 4 X For 2011-2012 Ford Explorer Front And Rear Complete Struts Shocks Springs USD 179.55 Picture
2 Rear Wheel Hub Bearing For Hyundai Sonata Tucson Kia Optima Sportage Cadenza
Specifications
- Fits both LH (Driver Side) & RH (Passenger Side) REAR
- Has ABS sensorw/stainless steel sensor & plastic wire clips
- Direct fit, designed for vehicle specific application on all makes and models
- Latest generation design used in manufacturing our hub assemblies
- High quality seal design ensures a clean, long lasting hub bearing
- Sensors designed to match specific make and model
- Precision machined and pre-coated with anti-corrosion lubricant
- Manufactured for quick and easy installation
For the following years and models:
- For Hyundai Sonata 2015Built After 4/2014; Without Electric Parking Brake
- For Hyundai Sonata 2016-2019Without Electric Parking Brake
- For Hyundai Tucson 2016-2017FWD; Gas
- For Hyundai Tucson 2018-2021FWD
- For Hyundai Veloster N 2019-2022
- For Kia Cadenza 2017Without Electric Parking Brake
- For Kia Cadenza 2018-2020
- For Kia Optima 2016-2020Without Electric Parking Brake
- For Kia Sportage 2017-2019FWD; Without Electric Parking Brake
- For Kia Sportage 2020-2021FWD
- For Kia Sportage 2022FWD; Except Nightfall Edition
Packing include:
2 Pcs wheel hub bearing
1 Year Warranty
How to Install a Wheel Bearing Hub
Park the vehicle on a flat, level paved or concrete surface. Place the vehicle in gear or park and apply the parking brake. Place a wheel chock behind a rear tire (or front if you're doing a rear hub-bearing assembly). Loosen the lug nuts on the wheel of the hub bearing you're replacing with the breaking bar and a socket; do not remove them. Lift the wheel with the floor jack in a safe and secure manner. Support the vehicle on a jack stand, preferably on the frame rail if present. Remove the lug nuts and wheel. Locate the caliper bolts and remove them with the ratchet and a socket. Pry the caliper off gently using a large straight-edged screwdriver and support the caliper on the coil spring with a bungee cord. Do not allow the caliper to dangle on the rubber brake hose. Locate the caliper bridge bolts (if applicable) and remove them with the ratchet and a socket. You may want to break them loose with the breaking bar first if they're really tight. On some vehicles, the brake pads will remain in the bridge and can be removed by prying out with the screwdriver. On other models, the pads stay intact and may be clipped to the caliper. If you have to remove the pads, do so by taking note how they were placed in the bridge and be sure you're able to put them back in the same manner they were extracted. Remove the rotor. If it is stuck to the hub, you may have to hit it with a large rubber mallet. Use a rubber mallet if you're not going to replace the rotor, so you don't damage the surface. Remove any ABS wires attached to the hub bearing assembly (if applicable) or unclip the wire and trace it to the plug. In many applications, if the ABS wire is integrated with the wheel-bearing hub assembly, a new one will come with it. If you're not sure, check the box of the new bearing and if there's an ABS wire, follow the wire until you locate the plug, unplug it and unclip it from its mounts. If ABS is present but not integrated with the bearing assembly, remove the sensor from the bearing with a ratchet and socket. Remove the spindle nut with the breaking bar and a spindle nut socket. Remove the washer behind the spindle nut. Locate the wheel-bearing assembly bolts behind the knuckle, and loosen them with the breaking bar and socket. The location of these can sometimes create a tight area to place a socket and tool on to remove them with. You may have to apply some ingenuity. Replace the socket on the ratchet to extract the bolts quickly and easier. Most hubs have three or four bolts. Install the slide hammer onto the lug studs and secure with tightened lug nuts. This may take several attempts and a couple of breaks in between to remove the hub bearing from the knuckle. Pay close attention to your progress and try to determine when the bearing will separate. Take note of how the backing plate is installed between the knuckle and the bearing so you can replace it in the same manner. Sand off the rust and corrosion around the knuckle with a fine- to medium-grade sandpaper. Move the drive-shaft spindle around to get it out of your way. Take your time when doing this and make sure it's as clean as possible. Place the backing plate in its original position and place the new bearing onto the knuckle. Manipulate the drive-shaft spindle splines into the center of the hub bearing. Push the bearing on as far as you can, making sure to line it up correctly if ABS lines or plugs are present. Replace the wheel-bearing assembly bolts. They're pretty long, so as soon as you can thread them into the new bearing, start to tighten them. Pull the bearing in by tightening the bolts a little bit at a time and then switching to the next bolt to make sure the bearing assembly does not shift in the knuckle and cause damage. Once the bearing is drawn in flush, use the breaking bar to get the bolts as tight as you can get them. Replace washer and spindle nut and tighten to proper torque specifications with the half-inch drive torque wrench and spindle socket. Replace the brakes in the same manner you extracted them. You may need to push the caliper piston in a bit with a C-clamp to get it over the rotor. Plug in the ABS lines or reattach them to the bearing, if applicable. Replace the tire and lug nuts, and tighten the lug nuts as tight as you can get them. Lower the vehicle and tighten the lug nuts in an alternate fashion with the torque wrench and socket at the correct wheel nut specifications torque setting. Pump the brake pedal if you had to push the caliper piston in with a C-clamp to restore hydraulic pressure to that caliper piston. Remove the wheel chock, release the parking brake, and go for a test drive. Item SpecificsManufacturer Part Number :Br512553Dx2 wheel hub bearingsInterchange Part Number :Br821876DLug Quantity :5 LugsHas ABS sensor :Yes (Has ABS with tegral Sensor)Brand :brakeautorSpline Quantity :N/ABolt Circle Diameter :4.5 in. / 114.3 mmWheel Pilot Diameter :2.64 in. / 67 mmArticle :Wheel Hub BearingFlange Offset :2.32 in. / 59 mmPlacement :Left Right RearFlange Diameter :5.63 in. / 143 mmBrake Pilot Diameter :2.99 in. / 76 mmWeight :6.89kgReference OEM number :52730C1100Other Part Number :For Kia HyundaiWarranty :1 YearPackage :2 pcs wheel hub bearing
Payment Policy
Please use the checkout system when paying for your order.
If you want to change the shipping address, please contact us by messages.
Shipping & Handling Time
Shipping:Delivery Time is about 3-7 business days to most of countries.
All domestic orders will be shipped via USPS, UPS or FedEx from our US warehouse and usually arrives to your door in about 2-7 business days.
Return Policy
Seller will beresponsible for return if there's any quality problem or wrong message provided in listing.
Be sure to check the compatible chart above, and be sure you have chosen the right item.
Warranty Policy
All of our brand new items come with a 30-Days money-back guarantee.
Contact Us
- Confused in confirming the compatibility about the item;
- Puzzled in how to install the item to your vehicle/car/truck/etc;
We are always here to answer and reply.