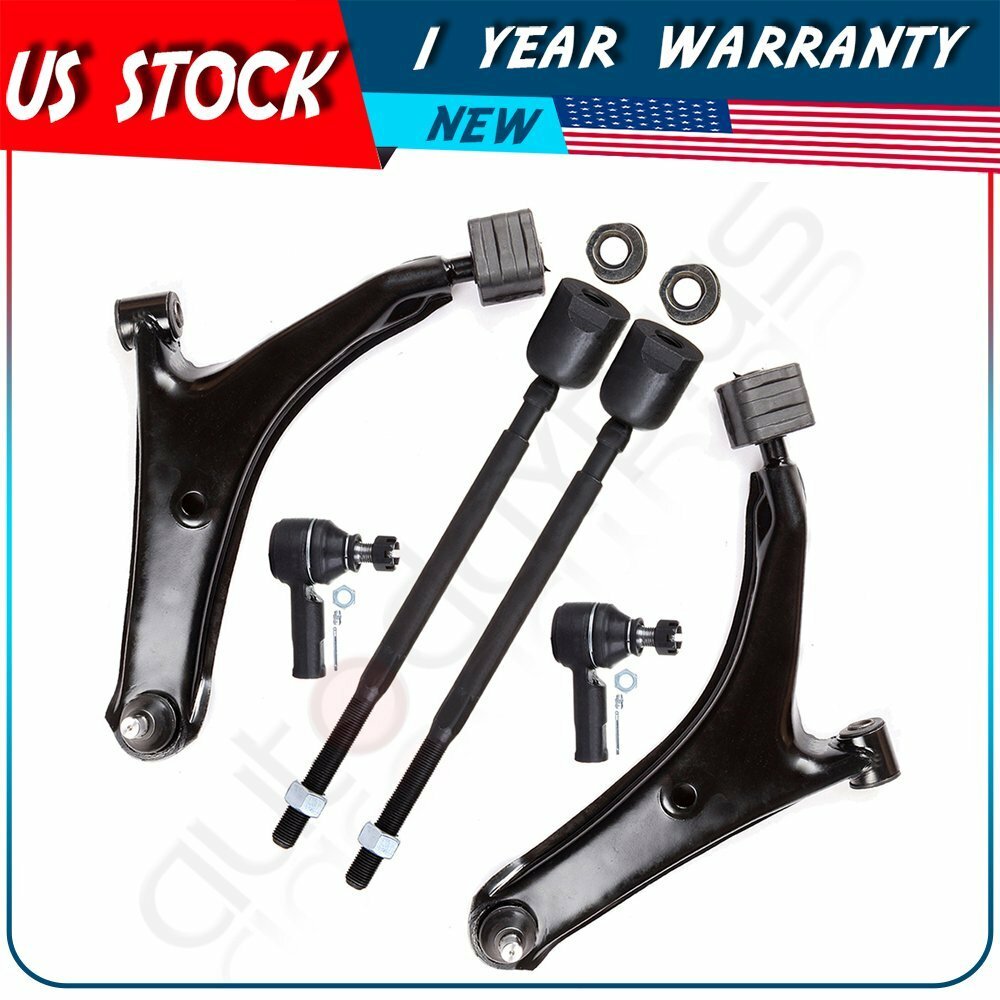
1.Fitting the Geo Metro2.Package Includes:1x Front Lower Control Arm And Ball Joint - Passenger Side -K6203041x Front Lower Control Arm And Ball Joint - Driver Side -K6203032x Front Outer Tie Rod End -ES3043RL2x Front Inner Tie Rod End (1).Please check the fitment chart above before payment makingsure all the suspension parts listed on this page are compatible with your automobile. (2).Please refer to Moog official website before narrowing down your search so as to avoid unnecessary item not as described return requests. For 1995-1997 Geo Metro 6Pcs Lower Control Arm And Ball Joint Tie Rod End Kit
1.Fitting the Geo Metro
2.Package Includes:
1x Front Lower Control Arm And Ball Joint - Passenger Side -K6203041x Front Lower Control Arm And Ball Joint - Driver Side -K6203032x Front Outer Tie Rod End -ES3043RL2x Front Inner Tie Rod End (1).Please check the fitment chart above before payment makingsure all the suspension parts listed on this page are compatible with your automobile.
(2).Please refer to Moog official website before narrowing down your search so as to avoid unnecessary item not as described return requests.
(3).Please contact our customer services for targeted discount after all the items are received if you have reached any targeted discount thresholds, the terms of which is atthe bottom of thispage.
Control Arm Bushing Replacement Reference:
Control arms themselves do not generally wear out, but the control arm bushings and ball joints do, so you will likely need to remove them to service those components. Yet, some OEMs or parts suppliers do not sell bushings and ball joints separately, so you may have to purchase the entire control arm and replace it as a unit. Also, control arms can become bent or damaged as the result of a collision or driving through a deep pothole, so control arms do need to be inspected for damage. Many control arms are now made from forged or sintered aluminum, so you may need to measure for damage or check it on an alignment machine.
Picture(A)
1.Remove the coil spring and steering knuckle by following the steps in previous skill drills.
2.Loosen the bolts holding the upper control arm in place. Note that there might be shim packs held in by the bolts. If so, tape them together in their packs, and label their />3.Remove the lower control arm by removing the bolts holding it in place. As you dismantle the system components, carry out a constant inspection of the parts being removed. Doing so will aid you when you need to order replacement parts. You should also mark mating parts with white paint to aid in reassembly.
Picture(C)
4.Inspect the upper and lower control arm for wear or damage. If the control arm bushings show signs of excessive wear or deterioration of the bushing material, they will have to be replaced.
5.Replace the worn bushings in the upper and/or lower control arm. Replacement of control arm bushings can be performed two ways—with a hydraulic press with correctly sized press tools or with an air chisel. Be careful using an air chisel: Damage to the control arm can result, such as gouging the mounting surface of the bushing if you slip with the />6.Press method: Place the control arm in a hydraulic press supported so the bushing is level to the press head. Using the correct-sized adapter, press the bushing out.
Picture(E)
7.Using the press, install the new bushing into the control arm. Be careful to start the bushing in straight, or you could bend the control arm. Press it in until the flange bottoms out.
Picture(F)
8.Air chisel method: Install the control arm in a vise. Use an air chisel to work the bushing out. Be careful not to gouge the mating surface of the control arm.
Picture(G)
9.Using the air hammer, drive the new bushing into place, making sure it is fully seated.
Tie Rod End Removing Guideline:
Tie rods make the final connection between the steering linkage and the steering arms. The point of connection with the steering linkage is considered the inner tie-rod end, and the end that connects to the steering arm is considered the outer tie-rod end. Checkingtie rods is important in identifying steering problems because the ends are frequently damaged or worn. There are two basic types of tie-rod ends: spring loaded and preloaded. Each type has its own procedure for inspection and replacement of the ends. Replacement of tie-rod ends requires an alignment to be performed, or rapid tire wear will raise the vehicle on a lift.
2.Inspect the rubber bellows for any signs of leaks, tears, or damage.
3.With the vehicle raised, have an assistant turn the steering wheel to one side or the other and rock the steering wheel from side to side.
4.On the side farthest out, squeeze the bellows until you make contact with the inner ball joint, and feel for any play in the inner tie-rod joint.
5.Repeat this procedure for the other side.
6.If play is found, replacement of the inner tie-rod ends will be the front wheel for the side being replaced, and loosen the locknut on the tie-rod end.
12.Using an inner tie-rod tool and the specified wrench to hold the rack, loosen the inner tie rod from the rack, and remove the inner tie-rod the new inner tie rod in reverse order of removal, and verify that the play is gone.
14.Perform alignment to reset toe after replacement is performed.
15.Test drive to verify repair.
Frequently Asked Questions
(1).Why should I get my tie rods inspected on a regular basis?
If you don't get your tie rods inspected on a regular basis, there are some warning signs to watch (and listen) for. If your vehicle pulls to one side while driving, or when braking, it's possible that bad tie rods may be the culprit. Your vehicle's tires will also show uneven wear on the inside and outside edge of the tire when there's a tire rod issue. However, one of the most noticeable signs of tie rods going bad will be a knocking sound coming from the front end of the vehicle when you turn into a parking space, or some other low speed, tight turning /> One of the first symptoms that your tie rods are damaged or breaking is that the steering wheel will vibrate slightly. This is especially prevalent when you are speeding up or turning. This happens because the steering wheel is losing its control over the tires, causing the steering wheel to shimmy as you drive.
(3).Shaking
As the tie rods become further damaged, you will start to notice that the car itself will start to shake. This happens because the tires may start to wobble without you having full control over them. Although you should take your car into a mechanic at the first sign of tie rod problems, if you experience your car shaking you could be at risk for serious tie rod damage-which can cause accidents. Take your car into a mechanic if you experience this tie rod symptom.
(4).Wandering
If your tie rods continue to go unchecked or unfixed, the rods can completely break. This can cause you to lose all control of your car, possibly resulting in an accident. When this occurs, the car will may "wander" as you drive. At this point, the steering wheel will have no control over the tires and the tires will start moving independently, causing the car to drift while you are driving. If this happens while you are on a freeway or busy road, you and others could be at serious risk of an accident. If you experience wandering, stop your car, call a tow truck and take your car to the nearest mechanic.
(5).Do I need to replace the control arm if the bushings are worn?
Because the weight of the car is transferred through the control arm two rubber bushings are fitted at the pivot point and bolted to the frame. Road conditions and driving habits can contribute to the wear of these bushings which will become worn and fall apart. These bushing can be inspected by raising the car up and looking for an irregular configuration of the rubber center of the bushing. Many control arms have the ball joint manufactured into the arm which will be replaced along with the control arm itself. When one control arm is worn it is highly advised to replace the opposing arm.
Shipping (1).Warehouse is located in Los Angeles, California, where local pickup transaction is temporarily not available.(2).USPS PO Box, APO Army Post Office, FPO Fleet Post Office addresses are not available.(3).We usually need a 1-2 business day as handling time for packaging and shipping scheduling. Estimated delivery dates should be 4-6 business days after your payment is received.Warranty Items valued over $15 on that include a warranty or service contract must contain additional details in seller's listing description.5 Year Warranty Terms and Procedures(1).The warranty terms only apply to all the auto parts purchased from AUTODAYPLUS.(2).AUTODAYPLUS carries no warranty responsibilities for any auto parts removing fees, installation fees, consulting fees, labor costs, towing charges, rental car reimbursements.(3).The stated 5 year warranty is limited to only one brand new replacement for each part purchased during 5 year warranty time period.(4).AUTODAYPLUS promises free replacement due to quality defects or item not as described issues within 60 calendar days from the date when buyers receive their items in the situation when buyers are willing to provide convictive proofs or professional diagnose report if required, otherwise AUTODAYPLUS has the right to refuse any replacement requests.(5).AUTODAYPLUS promises free replacement due to quality defects or item not as described issues after 90 calendar days from the date when buyers receive their items in the situation when buyers promise to prepay 15% of the original item sales price as postage for replacement, otherwise AUTODAYPLUS has the right to refuse any replacement requests.(6).AUTODAYPLUS carries no warranty responsibilities for any replacement due to car accidents, drag racing, unprofessional replacement, road hazard, disassembly.(7).Anyone who attempts to execute 5 year warranty procedures must be the original purchaser of the item(s), otherwise 5 year warranty terms void immediately.(8).Anyone who attempts to execute 5 year warranty procedures must provide screenshot of his or her original order details if required, including buyer user name, shipping address, item title, item id, final sales price.(9).AUTODAYPLUS has the final power of interpretation of the above 5 Year Warranty Terms and Procedures.Returns Refunds will be credited within 2 or 3 business days after returned item(s) is received.response 1. We maintain high standards of excellence (five stars review)and strive for 100% customer satisfaction! response IS VERY IMPORTANT TO US. We request that you contact us immediately BEFORE you give us neutral or negative response, so that we can satisfactorily address your concerns.2. It is impossible to address issues if we do not know about them!Payment Payments are expected within 7 days after the last winning sale is closed; Otherwise Unpaid Item Dispute will be filed with .
Shop CategoryStore Home PTO Clutch AC Compressor Cylinder Head Gasket Sets Towing Mirrors Oxygen Sensor Other Golf Cart Parts Tonneau Cover Sun Visor Roof Rack Timing Chain Kits suspension kit◈suspension kits◈suspension gxy◈suspension fu◈suspension cj Braking system parts◈Brake Rotors and Pads◈Brake Pads◈Brake Rotors◈Brake Calipers◈Brake Calipers & Rotors Pads◈Brake Drum◈Brake Pad Sensor◈Brake Shoes Lights◈Instrument Panel Lights◈Side Marker Lights◈Exterior Lighting◈Headlight◈Interior Lighting◈Cab marker Roof Running light Window Regulator UTV & ATV Brake System Parts▷Brake Pads♢Kevlar Carbon Brake Pads♢Sintered Brake Pads◈Brake Shoes Radiator Door Handles and Covers CV AXLE Fuel Pump Assembly wheel hub bearing Key Shell Case Ignition coil Shocks Struts Spoilers & Wings Wheel Spacers Lift Supports complete strut Window Switch ABS Wheel Speed Sensor Suspension+Strut+Bearing Door Lock Actuator Turbocharger Cooling Fan LED headlight Assembly Air Suspensions Fuel Injectors Body Kits HVAC winch Throttle Body Leveling Lift Kit◈leveling lift kit Power Steering Pump Bumper◈Complete Bumper Assembly◈Chrome Steel Bumper Starter Steering Rack Car Tools Mass Air-Flow Sensor Timing Belt Kits HVAC Vent Actuator Alternators idle air control valve Regulator Rectifier Parking sensor tie rod Consoles & Parts Thermostat Housing blower motor◈blower motor fan Radiator Coolant Tank leveling kit + struts shocks Variable Timing Solenoid (VVT) Horns Tire Pressure Sensor Transfer Case Shift Motor Water Pumps wheel lug nuts Oil Pump Valve Cover window visor Cargo Cover Hydraulic Lifter&Roller Lifter Strut Mount Tensioners 4 pcs wheel hub bearing Motor Registor Knock Sensor Power Extension Cord Wheel Hub Bearing Knuckle CDI BOX Truck Bed Storage Cylinder Piston Kit Jeep Dipstick Engine Mount Fender Fastener Radiator Support Cylinder Piston Gasket Kit Driveshaft Stator Garden Water Pump Splash Guards & Mud Flaps Sensor-8 Cooling Fan Clutch Rocker Arm Fuel Tank Pipe primary drive clutch snorkel air intake Steering U-Joint vehicle speed sensor Camshaft & Crankshaft Heater Cores Jack Stands Pillar Posts Wheel Hub Centric Rings Harmonic Balancer Light Bar Mount Bracket Windshield Wiper Motor Ballast module hub caps Air Cleaner Filter Box Steering Shaft suspension 7 Cold Air Intake Kit dash cover Fuse Holder Box transmission filter water Pump Impeller Fender flares Nerf Bars & Running Boards Rubber Seal Strip ATV Rear Wheel Axle Foot Rest Pedals Car Antenna Air Intake Hose steering knuckle-7 transmission kit Convertible Soft Top License Plate Frames Power Brake Booster Evaporators Bed Step Motorcycle Carburetor & Parts Intake Manifold Threshold Ramp Car Floor Mats Electric Water Pump Intercoolers tire pressure sensor Air Dryer Lower Kits & Parts Wheel Lug jumper cable Fuel Shut Off Solenoid Catalytic Converter Other Motorcycle Parts spark plugs LED 3RD Brake Light Dump Truck Tarp Motor snow chain Fuel Vapor Charcoal Canister Brake Dust Shield Window Moulding Weatherstrip Headlight Assembly-II ATV CV Axle Fuel Pump Assembly-II Fuel Pump Assembly-III Window Regulator-II Headlight Assembly-New OtherHot Item 8 Ignition Coil DG508 & Spark Plug SP479 For Ford F150 Expedition 4.6L 5.4L USD 37.99 4PCS Chrome Door Handle For 07-13 Chevy Tahoe GMC Yukon Sierra Denali Front+Rear USD 28.90 For Toyota Tacoma 95-04 Front Outside Outer Door Handle Pair 69220 69210 35020 USD 14.77 8 Ignition Coil Pack For 00-10 Ford F-150 4.6L V8 00-04 Ford Expedition DG508 USD 32.99 Starter For Truck Ford F-150 F-250 F-350 4.6L 5.4L V8 Pickups Mustang 12V 6646N USD 46.59 Picture
New List Item A/C AC Compressor For Toyota Tacoma 3.5L 1995-2004 CO 10246C 883200401084 USD 124.49 For 93-98 Ford Bronco E-150 F-150 93-94 Linconlin A/C Compressor 5U2Z19V703KA USD 123.59 New AC A/C Compressor Fits Chevrolet Colorado 2.5L 2015 2016 2017 2018 USD 144.79 A/C AC Compressor For 00-03 Chevrolet Impala 96-04 Buick Regal 3.8L USD 107.89 A/C AC Compressor For 2006-2010 Dodge Charger Magnum Chrysler 300 2.7L CO 30002C USD 120.59 Help & InfoPayment PolicyShipping PolicyReturn PolicyFAQAbout Us For 1995-1997 Geo Metro 6Pcs Lower Control Arm And Ball Joint Tie Rod End Kit
1.Fitting the Geo Metro
2.Package Includes:
1x Front Lower Control Arm And Ball Joint - Passenger Side -K6203041x Front Lower Control Arm And Ball Joint - Driver Side -K6203032x Front Outer Tie Rod End -ES3043RL2x Front Inner Tie Rod End (1).Please check the fitment chart above before payment makingsure all the suspension parts listed on this page are compatible with your automobile.
(2).Please refer to Moog official website before narrowing down your search so as to avoid unnecessary item not as described return requests.
(3).Please contact our customer services for targeted discount after all the items are received if you have reached any targeted discount thresholds, the terms of which is atthe bottom of thispage.
Control Arm Bushing Replacement Reference:
Control arms themselves do not generally wear out, but the control arm bushings and ball joints do, so you will likely need to remove them to service those components. Yet, some OEMs or parts suppliers do not sell bushings and ball joints separately, so you may have to purchase the entire control arm and replace it as a unit. Also, control arms can become bent or damaged as the result of a collision or driving through a deep pothole, so control arms do need to be inspected for damage. Many control arms are now made from forged or sintered aluminum, so you may need to measure for damage or check it on an alignment machine.
Picture(A)
1.Remove the coil spring and steering knuckle by following the steps in previous skill drills.
2.Loosen the bolts holding the upper control arm in place. Note that there might be shim packs held in by the bolts. If so, tape them together in their packs, and label their />3.Remove the lower control arm by removing the bolts holding it in place. As you dismantle the system components, carry out a constant inspection of the parts being removed. Doing so will aid you when you need to order replacement parts. You should also mark mating parts with white paint to aid in reassembly.
Picture(C)
4.Inspect the upper and lower control arm for wear or damage. If the control arm bushings show signs of excessive wear or deterioration of the bushing material, they will have to be replaced.
5.Replace the worn bushings in the upper and/or lower control arm. Replacement of control arm bushings can be performed two ways—with a hydraulic press with correctly sized press tools or with an air chisel. Be careful using an air chisel: Damage to the control arm can result, such as gouging the mounting surface of the bushing if you slip with the />6.Press method: Place the control arm in a hydraulic press supported so the bushing is level to the press head. Using the correct-sized adapter, press the bushing out.
Picture(E)
7.Using the press, install the new bushing into the control arm. Be careful to start the bushing in straight, or you could bend the control arm. Press it in until the flange bottoms out.
Picture(F)
8.Air chisel method: Install the control arm in a vise. Use an air chisel to work the bushing out. Be careful not to gouge the mating surface of the control arm.
Picture(G)
9.Using the air hammer, drive the new bushing into place, making sure it is fully seated.
Tie Rod End Removing Guideline:
Tie rods make the final connection between the steering linkage and the steering arms. The point of connection with the steering linkage is considered the inner tie-rod end, and the end that connects to the steering arm is considered the outer tie-rod end. Checkingtie rods is important in identifying steering problems because the ends are frequently damaged or worn. There are two basic types of tie-rod ends: spring loaded and preloaded. Each type has its own procedure for inspection and replacement of the ends. Replacement of tie-rod ends requires an alignment to be performed, or rapid tire wear will raise the vehicle on a lift.
2.Inspect the rubber bellows for any signs of leaks, tears, or damage.
3.With the vehicle raised, have an assistant turn the steering wheel to one side or the other and rock the steering wheel from side to side.
4.On the side farthest out, squeeze the bellows until you make contact with the inner ball joint, and feel for any play in the inner tie-rod joint.
5.Repeat this procedure for the other side.
6.If play is found, replacement of the inner tie-rod ends will be the front wheel for the side being replaced, and loosen the locknut on the tie-rod end.
12.Using an inner tie-rod tool and the specified wrench to hold the rack, loosen the inner tie rod from the rack, and remove the inner tie-rod the new inner tie rod in reverse order of removal, and verify that the play is gone.
14.Perform alignment to reset toe after replacement is performed.
15.Test drive to verify repair.
Frequently Asked Questions
(1).Why should I get my tie rods inspected on a regular basis?
If you don't get your tie rods inspected on a regular basis, there are some warning signs to watch (and listen) for. If your vehicle pulls to one side while driving, or when braking, it's possible that bad tie rods may be the culprit. Your vehicle's tires will also show uneven wear on the inside and outside edge of the tire when there's a tire rod issue. However, one of the most noticeable signs of tie rods going bad will be a knocking sound coming from the front end of the vehicle when you turn into a parking space, or some other low speed, tight turning /> One of the first symptoms that your tie rods are damaged or breaking is that the steering wheel will vibrate slightly. This is especially prevalent when you are speeding up or turning. This happens because the steering wheel is losing its control over the tires, causing the steering wheel to shimmy as you drive.
(3).Shaking
As the tie rods become further damaged, you will start to notice that the car itself will start to shake. This happens because the tires may start to wobble without you having full control over them. Although you should take your car into a mechanic at the first sign of tie rod problems, if you experience your car shaking you could be at risk for serious tie rod damage-which can cause accidents. Take your car into a mechanic if you experience this tie rod symptom.
(4).Wandering
If your tie rods continue to go unchecked or unfixed, the rods can completely break. This can cause you to lose all control of your car, possibly resulting in an accident. When this occurs, the car will may "wander" as you drive. At this point, the steering wheel will have no control over the tires and the tires will start moving independently, causing the car to drift while you are driving. If this happens while you are on a freeway or busy road, you and others could be at serious risk of an accident. If you experience wandering, stop your car, call a tow truck and take your car to the nearest mechanic.
(5).Do I need to replace the control arm if the bushings are worn?
Because the weight of the car is transferred through the control arm two rubber bushings are fitted at the pivot point and bolted to the frame. Road conditions and driving habits can contribute to the wear of these bushings which will become worn and fall apart. These bushing can be inspected by raising the car up and looking for an irregular configuration of the rubber center of the bushing. Many control arms have the ball joint manufactured into the arm which will be replaced along with the control arm itself. When one control arm is worn it is highly advised to replace the opposing arm.
ShippingWarrantyReturnsresponsePayment (1).Warehouse is located in Los Angeles, California, where local pickup transaction is temporarily not available.(2).USPS PO Box, APO Army Post Office, FPO Fleet Post Office addresses are not available.(3).We usually need a 1-2 business day as handling time for packaging and shipping scheduling. Estimated delivery dates should be 4-6 business days after your payment is received. Items valued over $15 on that include a warranty or service contract must contain additional details in seller's listing description.5 Year Warranty Terms and Procedures(1).The warranty terms only apply to all the auto parts purchased from AUTODAYPLUS.(2).AUTODAYPLUS carries no warranty responsibilities for any auto parts removing fees, installation fees, consulting fees, labor costs, towing charges, rental car reimbursements.(3).The stated 5 year warranty is limited to only one brand new replacement for each part purchased during 5 year warranty time period.(4).AUTODAYPLUS promises free replacement due to quality defects or item not as described issues within 60 calendar days from the date when buyers receive their items in the situation when buyers are willing to provide convictive proofs or professional diagnose report if required, otherwise AUTODAYPLUS has the right to refuse any replacement requests.(5).AUTODAYPLUS promises free replacement due to quality defects or item not as described issues after 90 calendar days from the date when buyers receive their items in the situation when buyers promise to prepay 15% of the original item sales price as postage for replacement, otherwise AUTODAYPLUS has the right to refuse any replacement requests.(6).AUTODAYPLUS carries no warranty responsibilities for any replacement due to car accidents, drag racing, unprofessional replacement, road hazard, disassembly.(7).Anyone who attempts to execute 5 year warranty procedures must be the original purchaser of the item(s), otherwise 5 year warranty terms void immediately.(8).Anyone who attempts to execute 5 year warranty procedures must provide screenshot of his or her original order details if required, including buyer user name, shipping address, item title, item id, final sales price.(9).AUTODAYPLUS has the final power of interpretation of the above 5 Year Warranty Terms and Procedures. Refunds will be credited within 2 or 3 business days after returned item(s) is received. 1. We maintain high standards of excellence (five stars review)and strive for 100% customer satisfaction! response IS VERY IMPORTANT TO US. We request that you contact us immediately BEFORE you give us neutral or negative response, so that we can satisfactorily address your concerns.2. It is impossible to address issues if we do not know about them! Payments are expected within 7 days after the last winning sale is closed; Otherwise Unpaid Item Dispute will be filed with .
All rights reserved.